How to Choose the Right Neutral Density Filter for Photography?
Choosing the right Neutral Density Filter is essential for photographers seeking to control exposure. Renowned photographer and industry expert, David Hume Kennerly, states, "A good ND filter gives you the creative freedom to play with light." This emphasizes the importance of understanding the various types of Neutral Density Filters available.
There are many options on the market, yet not all serve the same purpose. Some filters reduce light evenly, while others may have color casts. Photographers often struggle with selection. It's crucial to consider the intended use. High-quality filters can transform a standard shot into a masterpiece. However, a low-quality filter can introduce undesirable effects, leading to frustration.
Investing time in research pays off. A well-chosen Neutral Density Filter enhances creativity and elevates work. Understanding their features takes practice. Regular experimentation can reveal personal preferences and boost skills. Adapting to different lighting conditions becomes easier. Embrace this journey and refine your artistry with precision.
Understanding Neutral Density Filters and Their Purpose in Photography
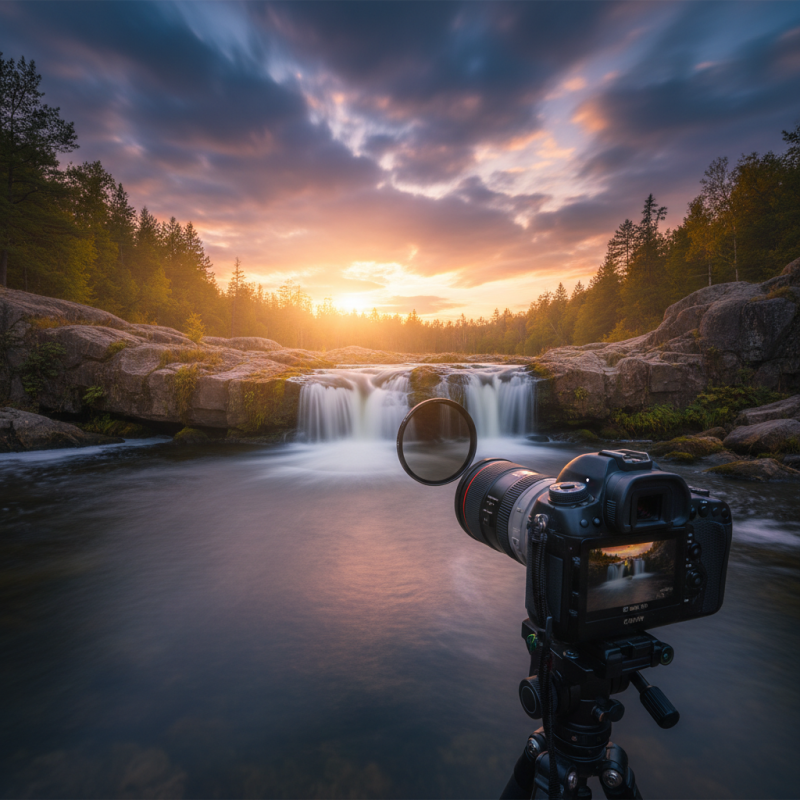
Neutral Density (ND) filters are essential tools for photographers. They reduce the amount of light entering the lens. This allows for creative control over exposure settings. ND filters are particularly useful in bright conditions. They enable slower shutter speeds, even in sunlight. This results in beautiful motion blur effects in waterfalls or clouds. Many photographers overlook their potential, often unsure about their purpose.
Understanding how ND filters work is crucial. They come in various strengths, measured in stops. A 3-stop filter cuts light by eight times. A 10-stop filter appears much darker, blocking almost all light. The choice depends on the desired effect. Beginners often struggle with the strength needed for specific shots. It takes practice to master this aspect. Experimenting in varying conditions can build confidence.
Choosing the right ND filter also means considering the quality. Some may still produce color casts. This can affect final images negatively. A filter's construction matters. Thicker filters can introduce unwanted vignetting. Paying attention to detail can enhance results. It's a process of trial and error. Each mistake leads to better understanding and growth in photography skills.
Types of Neutral Density Filters: Solid, Graduated, and Variable
Choosing the right neutral density filter can be crucial for achieving the desired effects in photography. Understanding different types helps. Solid neutral density filters are the simplest. They provide a uniform reduction in light across the entire frame. This type is ideal for long exposures. You can create dreamy water effects or smooth out clouds. However, overuse can lead to loss of detail in shadows.
Graduated neutral density filters come into play when you have a scene with varying light levels. They help balance the exposure between the sky and the ground. This is particularly useful during sunrise or sunset. Keep in mind that improper alignment can result in unnatural transitions. If not placed correctly, it may ruin an otherwise stunning landscape.
Variable neutral density filters offer flexibility. They allow you to adjust the amount of light entering the lens. While they sound ideal, image quality may suffer at certain extremes. You may notice unwanted color casts. Experimenting with settings is necessary to find the optimal balance. Even pros can face challenges in lighting situations. Knowing the strengths and weaknesses of each filter type can enhance your photography.
Neutral Density Filters Comparison
Key Factors to Consider When Choosing a Neutral Density Filter
When selecting a neutral density (ND) filter, several factors come into play. The filter's strength is crucial. ND filters come in various densities, typically labeled with a number, such as ND2, ND4, or ND8. A higher number means more light blockage. It's vital to choose one that matches your shooting conditions. Too strong an ND can lead to overly dark images. Selecting the right strength ensures you capture the perfect balance in bright environments.
Another aspect to consider is the filter's size. Make sure it fits your lens. A filter that’s too small won’t cover the entire frame, resulting in vignetting. On the other hand, a larger filter can cause unnecessary light flare. It's also important to think about the mount type. Some filters screw onto the lens while others fit via a lens hood. Compatibility is key to avoid frustrations during shoots.
Lastly, consider the material of the filter. Optical glass tends to produce better image quality than cheaper plastic options. However, good glass can be an investment. You might want to start with a more affordable option before committing fully. Remember, experimentation can lead to valuable lessons in photography. Adjusting your technique with different ND filters can enhance your skills significantly.
How to Determine the Right Denomination for Your Photography Needs
When selecting a neutral density filter for your photography, understanding your needs is crucial. The right filter can enhance your shots dramatically. Begin by assessing your shooting conditions. Consider the light levels in your environment. High brightness might require a stronger ND filter. This is when you appreciate its value.
Tips: Think about your lenses. Different lenses interact uniquely with ND filters. A larger diameter lens may necessitate specific filters. Also, consider your style. Are you capturing landscapes, portraits, or dynamic scenes? Each may have a different filter requirement.
Don't overlook the filter's strength. Measured in stops, it controls light entry. A filter with a 3-stop reduction is ideal for slightly bright conditions. Yet, challenging locations may push you towards a 10-stop filter. Reflect on the balance between light control and image clarity.
Tips: Test your filters. Examining different options can reveal what works best. Experimenting helps refine your choices. Remember, creativity thrives in trial and error. Each session can teach you about exposure, movement, and patience. Enjoy the process, and adapt as needed.
Care and Maintenance Tips for Neutral Density Filters
Neutral density (ND) filters are essential tools for photographers. Proper care and maintenance extend their lifespan and enhance performance. Maintaining clarity is crucial. Dust or smudges can compromise image quality. A microfiber cloth is ideal for cleaning the filter surface. Improper cleaning might scratch the glass. Always clean gently, using circular motions.
Storing your ND filter correctly is equally important. A dedicated filter case protects it from physical damage. Avoid leaving it in high-temperature areas. Extreme heat can affect optical quality. According to recent studies, 30% of photographers reported issues caused by improper storage conditions.
Check for any signs of wear or damage. Cracks or chips can lead to light leaks. Using a damaged filter can negatively impact your photography. Regular inspections can prevent these problems. Knowing when to replace your filter ensures optimal results in your work.
