How to Choose the Best LED Wall Packs in 2026
Choosing the right led wall packs in 2026 is not just a matter of picking the brightest fixture. A loading dock, apartment entrance, and long side wall each need a different light pattern. Mounting height, spacing, glare, weather exposure, and maintenance access all affect the result. Richard Kelly, the influential lighting designer, wrote, “Light is the first element of design; without it there is no color, form, or texture.” His point applies outdoors, too: useful illumination depends on how light reaches a surface, not merely on a number printed on a box.
A practical comparison starts with the site. Note the wall material, mounting height, nearby windows, and areas where shadows could hide steps or equipment. Then compare lumen output and distribution, color temperature, dimming options, photocells, and construction ratings. Review photometric data when available; two fixtures with similar output can cast very different patterns. Check product documentation and warranty terms, and confirm that installation suits the location and applicable requirements.
There is no universal best model. A high-output fixture can create harsh glare when mounted too low, while a compact one may leave dark gaps along a long façade. That detail is easy to miss. This guide will help readers weigh performance, durability, controls, and total cost before choosing led wall packs. It will also flag trade-offs, because even a well-reviewed product can disappoint when its beam pattern or mounting setup does not fit the site.
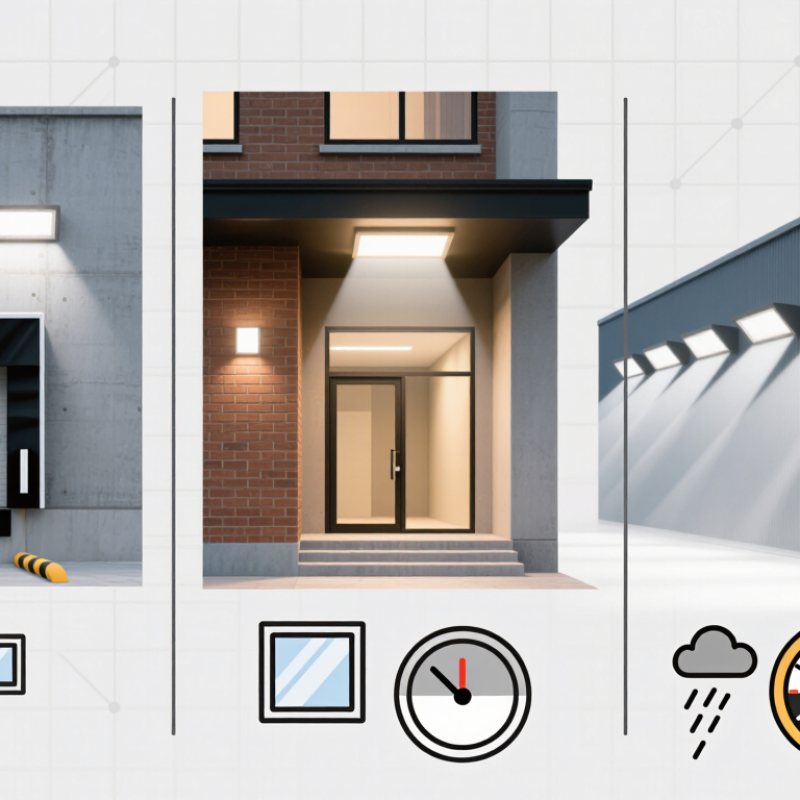
Assess the Site, Lighting Purpose, and Required Coverage
Start with the site. Note mounting height, wall material, nearby windows, and anything that blocks the light. A canopy, tree, or projecting sign can cast a sharp shadow across a doorway. Sketch the building and mark entrances, pedestrian paths, parking spaces, and loading areas before comparing fixtures.
Next, define the lighting purpose. A service door may need clear visibility at the lock, while a parking area needs broader, more even coverage. Check the fixture’s distribution pattern and review a photometric layout when available. Lumens alone do not show where light will land. Measure after dark. A quick site check can reveal glare in a driver’s line of sight or a dim corner hidden by daytime brightness.
Choose coverage based on the real mounting position, not an idealized drawing. Higher installation points spread light farther, but may leave the wall near the fixture looking harsh and the ground less useful. Lower mounting can create bright patches. I would rather see a modest overlap between light patterns than a dark gap at a frequently used entrance. Still, the best layout depends on the actual site; even careful measurements can miss reflections from pale walls or wet pavement.
How to Choose the Best LED Wall Packs in 2026 - Assess the Site, Lighting Purpose, and Required Coverage
| Site or Lighting Purpose | Typical Mounting Height | Planning Illuminance* | Indicative Luminaire Output | Useful Light Distribution | Selection and Coverage Considerations |
|---|---|---|---|---|---|
| Building entrances and pedestrian doors | 8–12 ft (2.4–3.7 m) | About 5–10 foot-candles (54–108 lux) near the entrance, subject to the project brief | About 2,000–6,000 lumens | Forward-throw or semi-cutoff distribution | Prioritize visibility at faces, door hardware, and steps. Check for shadows from canopies and avoid directing light into nearby windows. |
| Small building perimeter or service walkway | 10–15 ft (3.0–4.6 m) | About 1–5 foot-candles (11–54 lux), depending on activity and security needs | About 3,000–8,000 lumens | Forward-throw, with shielding where needed | Assess wall length, fixture spacing, obstructions, and the desired uniformity. A higher lumen rating alone does not guarantee even coverage. |
| Loading dock or active service area | 15–25 ft (4.6–7.6 m) | About 5–20 foot-candles (54–215 lux), based on tasks and applicable requirements | About 8,000–20,000 lumens | Wide or forward-throw distribution; asymmetric optics can help direct light onto the work area | Consider truck positions, dock geometry, vertical visibility, and glare for drivers. Confirm the layout with photometric calculations. |
| Parking area along a building wall | 15–25 ft (4.6–7.6 m) | Often around 0.5–2 foot-candles (5–22 lux) on the pavement, adjusted for site use and local criteria | About 8,000–20,000 lumens | Forward-throw or asymmetric distribution aimed across the parking area | Wall packs may supplement rather than replace pole-mounted lighting. Check pavement uniformity, property boundaries, and spill light. |
| Long wall or building corner with broad perimeter coverage | 12–20 ft (3.7–6.1 m) | Set a project-specific target; avoid relying on a single average value | About 5,000–15,000 lumens per fixture as a starting range | Wide distribution, or a combination of forward-throw and corner optics | Use spacing and aiming that limit dark gaps and overlapping hot spots. Review the manufacturer’s IES photometric file for the proposed mounting height and spacing. |
| Residential or light-commercial area near windows | 8–15 ft (2.4–4.6 m) | Use the lowest level that safely meets the task and local requirements | About 2,000–8,000 lumens | Full-cutoff or shielded forward-throw distribution | Control light trespass with shielding, careful aiming, and suitable controls. Verify local rules for uplight, curfew, and property-line limits. |
Planning notes: Output ranges are starting points, not guaranteed coverage. Actual results depend on optics, mounting height, spacing, surface reflectance, obstructions, and maintained light levels. For a final selection, compare photometric files and calculate both illuminance and uniformity. Choose a suitable wet-location rating for exposed installations, confirm operating temperature and surge protection requirements, and consider dimming or photocell controls where appropriate. Local codes and project specifications take precedence.
Related Posts
-
What Are the Benefits of Using LED Wall Packs?
-
How to Choose the Right LED Wall Pack Light for Your Commercial Space
-
Best LED Wall Packs for Maximum Energy Efficiency?
-
How to Choose the Right Commercial Lighting for Your Business?
-
Ultimate Tips for Choosing the Best Lighting Fixtures?
-
Top 10 Commercial Lighting Suppliers for Global Buyers